

There are several ways how to put text on a curved path.

One is using the build in Gimp feature of 'Text along path'.
For a description look here: Gimp Manual

An alternative is ofnuts' excellent 'Text-Along-Path' python plug-in,
which has a ton more options.
You can find the description here: Plug-in Manual

Another good way of putting text on a path is using Inkscape.
You can edit and scale the text a lot easier than in Gimp !
PhotoAdvanced2 on Youtube has a good tutorial on that topic:
and this one, by VscorpianC is even better:

Update for 2018:
Note that ofnuts has updated the plug-in recently and added more options (plus a "Multi" functionality that lets you put text on more than one path at once).
One very important addition is the 'Reverse Stroke Direction' Option, which lets you control the direction of the path without using the 'Flip Tool' on the circular skeleton path.
For more on path directions, look here.
So the plug-in may look a bit different today, but the tutorial, which was originally written for Gimp 2.8, still works as it is.
Also note the default direction of paths has reversed in Gimp 2.10, which could be considered a bug.
01. I start with a canvas of 800x800px and guides at 50% horizontally and vertically.
(Its very important to not work with a canvas that is too small, because there is the danger the text might look jaggy.)
02. Create a circular selection, starting at the crossing of your guides.
Make sure you have 'Expand from centre' and 'Fixed' ticked in the 'Ellipse Select Tool' Options.Note that ofnuts has updated the plug-in recently and added more options (plus a "Multi" functionality that lets you put text on more than one path at once).
One very important addition is the 'Reverse Stroke Direction' Option, which lets you control the direction of the path without using the 'Flip Tool' on the circular skeleton path.
For more on path directions, look here.
So the plug-in may look a bit different today, but the tutorial, which was originally written for Gimp 2.8, still works as it is.
Also note the default direction of paths has reversed in Gimp 2.10, which could be considered a bug.
01. I start with a canvas of 800x800px and guides at 50% horizontally and vertically.
(Its very important to not work with a canvas that is too small, because there is the danger the text might look jaggy.)
02. Create a circular selection, starting at the crossing of your guides.

02. Convert the selection to a path (Menu: Select → To Path), then deselect.
03. In your Paths Tab, left click on your circle-path and in the menu go to 'Tools' and then 'Text along path'.
(should you not have a 'Paths Tab' you can open it via 'Windows → Dockable Dialogues → Paths')

Type your text and make sure you have the right options activated.

Notice how the text is generated upside down. This is because paths have a beginning and an end.
The plug-in generates the text from the starting point of the circle, following the direction of the path.
04. To fix the position, call up the Rotate-Tool and make sure its set to path.


05. Create a new transparent layer, call up a selection from the text-path and fill it with a colour of your choice (i used a 30ies gray (#4d4d4d). Then deselect !
Also turn off the visibility of the text-path.
06. For the second set of text call up the 'Flip Tool', make sure its set to path and flip the circular path horizontally.
It may seem nothing has changed, but you just changed the direction of the path.
The effect will be clear in the next step.

07. Call up the 'Text Along Path' plug-in and type something else.

08. Fill the selected path with colour on a new transparent layer, then deselect and turn off the visibility of all paths.
09. Make a circular selection from the center of the page (with a fixed aspect ratio of 1:1), fill it on its own transparent layer with a colour of your choice, then resize the selection to make it smaller and cut.

10. I added a dropshadow to the text and a bevel (Highlight: #e7e7e7; Shadow: #262626) with layerfx.

11. Merged the bevel highlight and shadow layers with the text, then made it look metallic with a curve.
Also filled the background with a slate pattern.

12. To finish this project, i added Noise (G'MIC -> Degradations -> Noise [additive]) and a stroke to the red ring, plus a subtle dropshadow.

Expanded update for 2018
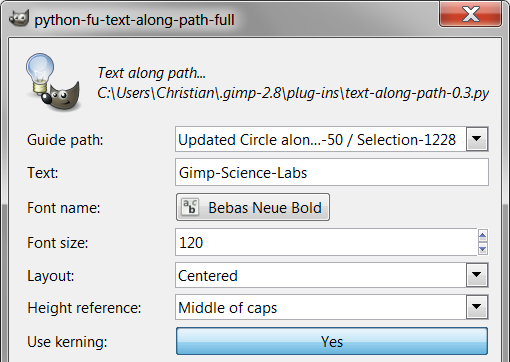
Depending on the font, it may be difficult to align two sets of text on the same path with the options i used above.
For example, the very popular 'Bebas Neue Bold' Font doesnt work with the 'Middle of box' method.

But because 'Bebas Neue' is an all caps font, we can make use of the 'Middle of caps' option.

If that doesnt work, use two seperate different sized paths for each set of text.
So whats really important is to understand the 'Height Reference' options ofnuts' plug-in provides.

Baseline is how you would write on lined paper. Only descenders like 'y,' 'g' and 'j 'cross this line with their tails.
Then we have three entries with "box".
Box means bounding box, a term you might know from Inkscape.
Its like a box around the text.
This box may or may not line up with the boundaries of the text, depending on how the font was designed.
Caps uses the height of the capital letters as reference.
In the 'Bebas Neue' example you may also notice an overlap between letters (here in the word 'Lab' between the L and the A).

This can be remedied with 'Kerning'. Kerning is the space between letters.
So i added an 'Extra Spacing' of 11px to get rid of the overlap.
Notice how this makes the text also much wider.

One of the disadvantages of using ofnuts plug-in, compared to Gimp's native 'Text Along Path' function, is that you cant apply kerning to individual letters. It is alway applied to the overall text (which technically makes it Tracking, not Kerning) and depending on the quality of the font, this may not look good (a sign of well designed fonts is perfect looking kerning !).
If you really need a flexible and at all times editable method for putting text on a path, then you should use Inkscape.
Another question you all might have is: how do you put text on a path that is not a perfect circle (like an ellipse) ?
Two options: draw the curve with the Paths Tool (perhaps with the aid of a helper object, like a filled ellipse), or: do some node editing.
Lets say you converted an elliptical selection into a path. A click with the Paths Tool reveals the nodes, so now we have to add nodes and delete segments.

Zoom in real closely and with the CTRL key pressed, click on the path to add a node.
To delete a node or a segment between two nodes, hold down CTRL + Shift and click.

Use this path with the centered layout option for the text.

If you want (for some strange reason) the text hanging from the path, instead of on top of it, use the 'reverse stroke direction' option near the bottom of the dialogue.

That concludes this tutorial.
Thank you !
No comments:
Post a Comment