
This tutorial is very much based on EK22's air bubble technique.
My initial idea was to create text made of bubbles, but that would not have been possible without Rononour's fantastic 'Pack sprites' G'MIC filter.

Lets begin:
01.
Create your canvas, i used 800x600px
white.
02.
Type and align your text, a rounded
bold font works probably best,
i used Valken 300px.
03.
Alpha select your text and save to a
channel for future use, then delete the text layer.
04.
With the selection still on, activate
the background layer and press delete – this will be our mask.

05.
Next fill the mask with a few big
bubbles.
Use a round brush in a medium 50 grey (#808080).
Make sure the dots dont overlap the
mask and position them in a way, so smaller bubbles will have enough
space around the big dots

06.
Create a new transparent layer on top
of your mask and fill it with one smaller dot, i used a 25px brush
size.
07.
Go to G'MIC → Pattern → Pack
Sprites.
I used all the default values, except
for 'Masking', that has to be set to 'Mask as bottom layer'.
Set 'Input layers...' to 'All' and
'Output' to 'New Layer'.

08.
We now want to get rid of the white
mask, so with the 'Select by Colour' Tool select all the white pixel and delete (then deselect).
Also add a (blue) background.

09.
Alpha select your packed bubbles and
save the selection to a channel,
(deselect) then activate the channel
and apply a Gaussian Blur of 5px.
(in case you dont like bumpmapping with a channel: duplicate the
packed bubbles layer, lock the alpha channel, drag white over it,
unlock the alpha channel and blur by 5 – that gives you the same
bumpmap)
10.
Bump-map your grey bubbles layer with
the blurred channel as the bumpmap.
I set the Azimuth to 90°, because im
going to make underwater bubbles, so the sun/light is above the water.
Set the Elevation to a value that gives
a strong highlight (i used 20),
a Depth of 4 was enough for my taste
but the shadow was bit strong so, i changed the 'Ambient' to 65 (btw,
this is all stuff i learned from ChrisF's Cookie tutorial).


11.
As a backup, alpha select the bubbles,
save to a channel, then apply a 'Colour to Alpha' with the medium 50
grey to your bubbles layer – we want the shadows and highlights
isolated.

12.
Now we work on the 3D effect.
Duplicate the packed bubbles layer.
We want one layer with the shadows only, and the other layer with the highlights only,
so we apply a 'Colour to Alpha' with
white on one layer and another one with black to the other.

12.a.
Duplicate the highlight layer, blur by
3px and tighten it with an alpha curve, for a nice crisp light.

12.b.
Set the shadow layer Mode to 'Grain
Merge', then duplicate and invert the colour of the upper layer.
Reduce the opacity of the dark shadow
to 70% and the inverted to 83%
You can change the Mode of the original (non tightened)
highlight, to 'Soft Light', 'Grain merge' or leave it at 'Normal'.
In 'Normal' Mode you get a very strong
white.
In 'Soft Light' Mode it looks all very soft and picks up the background colour.
In 'Grain Merge' Mode you get a stronger white, but still with the blue being integrated.
In 'Soft Light' Mode it looks all very soft and picks up the background colour.
In 'Grain Merge' Mode you get a stronger white, but still with the blue being integrated.
I liked the 'Soft Light' best, but
duplicated the tightened highlight to make it stronger

12.c.
Depending on the effect you are going for, you can also
add a dropshadow, that is knocked out by the layer.
So add a new transparent layer on top
of the BG.
Activate the saved bubbles selection and
fill it with a dark colour (#072666).
Deselect, then Gaussian Blur (i used 5px)
Maybe offset 1px down, then apply an
inverted layermask from the bubbles channel.
I set the mode to 'Burn' and reduced
the Opacity to 15%.

Thats it for the 3D shaping.
13.
Now comes the decorating part.
13.a.
Add a gradient black (or very dark
blue) to transparent, from the bottom of the canvas to the bottom of
the text.
Repeat until happy or manipulate with
an alpha-curve.

13.b.
Duplicate the BG and put it on top of
the dark gradient layer.
Go to G'MIC → Light & Shadow →
Light patch.
I used default values except for the 'Density' → 10.
Set the Mode to 'Soft Light' reduce
Opacity to 40% and apply a white layermask.
Paint a gradient from black to white on
that mask, to make the Light Patch fade out into the darkness.

13.c.
For some underwater lighting effects i duplicated the
white shadow layer, put it on top of all layers, then applied G'MIC →
Light & Shadows → Light Rays.
Set the mode to 'Screen' (with Opacity
at 20%), then dragged the center of the rays to the top of the canvas
and smudged the visible border with the Smudge Tool.
13.d.
You can add Solid Noise on top of the
layers at default values, then apply G'MIC → Deformations → Raindrops and set the Mode to 'Soft Light' for a water texture
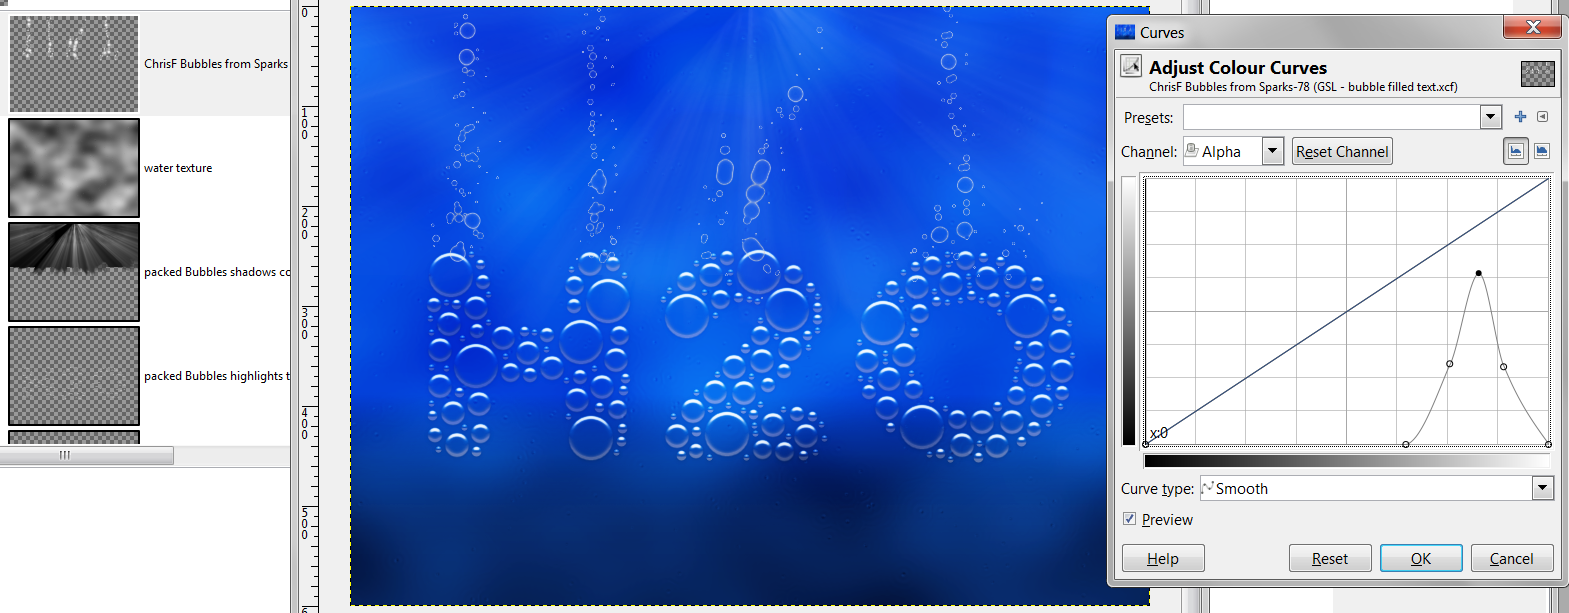
14. or you can add some different
bubbles
ChrisF has posted a video on how to
create liquid and bubbles here, but its in german....
....basically you paint bubbles with the
sparks brush, then desaturate (luminosity) and apply an alpha-curve,
change Mode to 'Grain Merge' and reduce
Opacity to 30%
Thats the basic underwater effect.

As you can see, you can do a lot more with that basic effect:
New version here.

Filling the bubbles with a colour
changes them to shiny pearls.
Here i tried to go for a daylight version with iridescent highlights made with a rainbow gradient on repeat.

No comments:
Post a Comment