Well that was fun, because i
was so fascinated by Chris' excellent result that i wanted to create
something similar and one of my experiments was the green glittery
Phase2 text.
Last week i finally found the lost xcf on my computer and thought i could write a tutorial.
Unfortunately i cant remember how i did
the glitter, which is funny because my techniques are pretty samey
and predictable.
So i will present a variation of the
Phase2 effect today.
01. Start with a canvas of 1000x500px,
colour: #bababa.
02. I made the texture with a grunge
brush. Unfortunately i cant remember which one.
Possible, it was xBlblx's Grunge Brush
Set, treated with G'MIC Pastell Art.
You can find the set here:
Obviously any other grunge brush,
texture (concrete for example) or technique will do.
Or you can use mine (open in new tab and save):
03. Set the mode to 'Soft Light' at
approx 45%, then merge down.
04. Next type your Base-Text.
Im using the font: 'Kaushan Script' at
284px in a #b3de27 green.
You can get that font here:
You can get that font here:
05. Alpha select your text, save it to
a channel and a path, then deselect !
NOTE:
In this tutorial i will set up the basic
design first and the decorating later.
Normally i would do it the other way
round:
Make the text, add bevels, texture,
etc. and then build up the composition.
06. For a Shadow-Mat, alpha select your
text, grow the selection by 15px and fill it on a new transparent
layer with a 20ies gray (#343434).
Convert the selection to a path then
deselect.
To make the edges nicer, stroke the
path on the same layer, with the same colour by 3px.
If there are some gaps left, fill them
with a brush.
07. On a new transparent layer
underneath your text, Stroke the path by 7px with a medium gray
(#808080).
Now for the decoration:
08. Add an Inner Shadow to the Base-Text.
a) alpha to select Base-Text
b) invert
c) fill with a darker shade of the
green we used for the text: #002e1b
d) deselect
e) Gaussian Blur by 20px
f) Offset by x: -2; y: -4 ('Layer →
Transform → Offset')
d) add layermask from channel
e) set Mode to 'Hard Light'
f) adjust blur with an alpha-curve at
coordinates approx: 121/172
09. For the Highlight:
a) create new transparent layer on top
of the Base-Text-layer (name it Highlight-Base) and turn it off !
b) alpha select your base text and
shrink it by 3px
c) fill with any colour (i used red for
visibility)
d) use the values from my screenshot
(adjust Angle and Altitude so that you
get a nice highlight, depending on the font, that can vary)
e) delete the shadow-layer
f) tighten the highlight with an
alpha-curve (thats why i used the high value of soften (= blur) in
the first place) – again, this curve can vary, depending on your
project !
Use the Force, Gimper ! ;)
Use the Force, Gimper ! ;)
g) i like to set the Mode to 'Addition'
for the strongest white, but 'Screen' will do as well
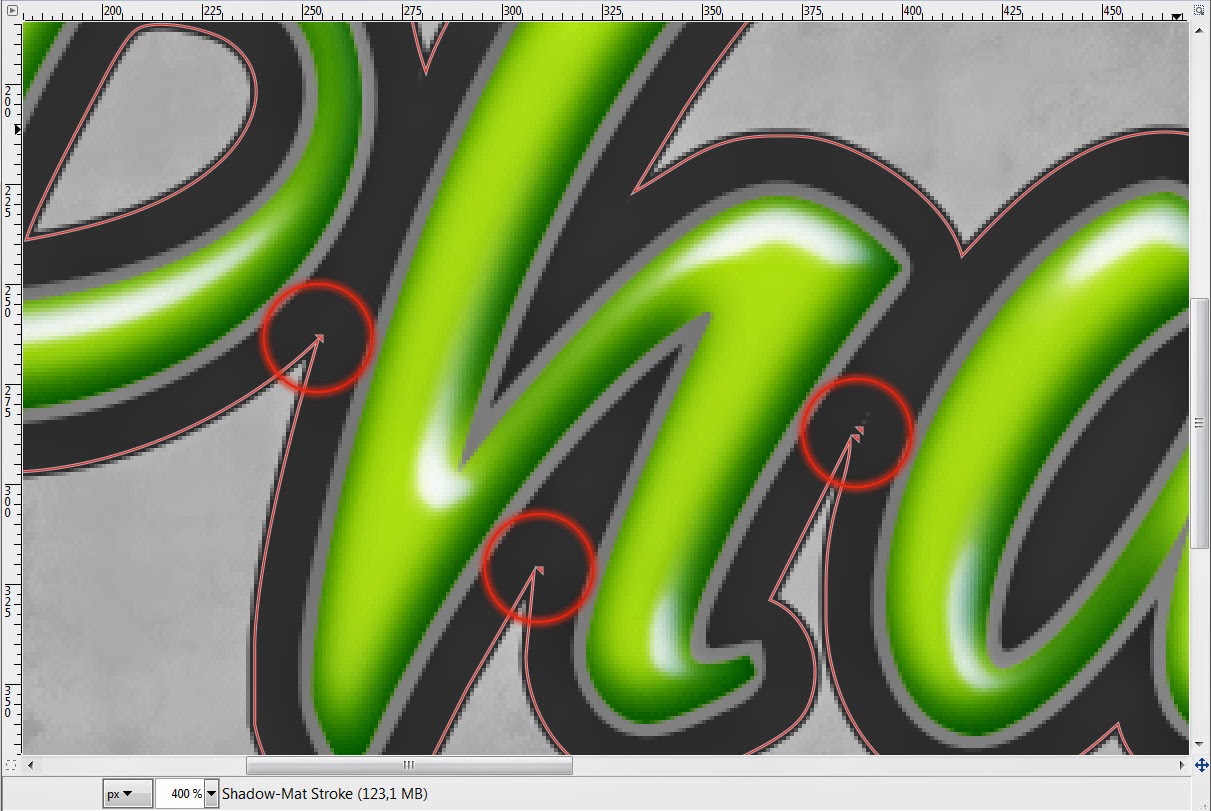
For reasons unknown to me, the path of
the Shadow-Mat has a few artifacts (little triangles).
You will have to delete them manually
with the Paths-Tool.
With that done:
10. Create a new layer on top of the
Shadow-Mat (name it Shadow-Mat-Stroke) and stroke the Shadow-Mat path
with a 40ies gray (#656565) by 2px, then Gaussian Blur it by 1px to
smooth the slightly jaggy looking edges.
11. Add a Dropshadow to the Shadow-Mat:
a) alpha select Shadow-Mat
b) fill with black on a new transparent
layer (named Dropshadow)
c) Blur by 12px
d) set Mode to 'Multiply' at 75%
12. Activate the Stroke layer and apply
a Bevel, with the following values.
13. I added a Mini-Shadow under the
base-text layer:
a) create new tansparent layer
underneath the Base-Text
b) alpha select Base-Text, fill with
black
c) Gaussian Blur by 1px
The effect is very subtle !
And last, the killer feature, you've
been all waiting for: the Glitter !!!!!!!!!!!!!!!!
14.
a) Duplicate the green Base-Text and
rename it Glitz.
b) Apply the Cubism Filter (Filters → Artistic → Cubism) with the
following values:
c) Apply a layermask from channel.
d) set the Mode to 'Soft Light'
15.
a) Duplicate the Base-Text again, put
it on top of the Glitz-Layer and name it Glitz 2.
b) Apply the Mosaic Filter (Filters →
Distorts → Mosaic)
c) alpha select the Base-Text and
shrink by 5px
d) apply a layermask from selection,
then deselect
e) with the layermask active, Gaussian
Blur it by 5px for a softer transition
d) with the Glitz 2 layer active apply
'Adjust Hue/Lightning/Saturation'
Make sure the yellow channel is ticked
!


1 comment:
Love the Phase2 text effect.
Post a Comment