
Its also quite possible the 'Live Path Effects' (LPE) were buggy and not as refined as they are now.
So that probably explains why i used the 'Pattern Along Path' Extension and not the LPE.
Today i'll show you the best method for 2018, which is not only easier but also looks better.
Im using Inkscape Version 0.92.3.
The pattern building works pretty much the same as in the old tutorial, with a grid, but without the need for invisible placeholder.
As you can see, the meander pattern is build from multiple squares with the same height/width.
So the first thing you have to do is decide on a „Unit“.

I work with a canvas of 800x800px and a circle of 605px (Visual Bounding Box).
The Unit im using for the grid is 8px.


Build the pattern with the help of snapping.
Duplicate, resize and rotate the rectangular building blocks as needed with the buttons in the Tool Controls and Command Bar.

Once everything is in place, 'Union' all the pieces into one single path.
This is the pattern we are going to apply to the circular skeleton path.

Copy the pattern to the clipboard.
Either with the keyboard shortcut (CTRL + C), or the Menu (Edit → Copy), or the little icon in the Command Bar.

Make sure the circular skeleton is a path and has a Fill but no Stroke.
Once selected, apply the 'Pattern Along Path' LPE.
In case you dont have the LPE window open, you can find it in the menu under 'Path → Path Effects'.
Inkscape says the keyboard shortcut is 'Shift + CTRL + 7' but on my (german) keyboard its 'Shift + CTRL + 6'.
In the 'Pattern Along Path' (Pap) menu, click the 'Paste' button and set the 'Pattern copies' to 'Repeated, stretched'.


You may notice that once the pattern is applied, the skeleton circle is slightly deformed. This can be remedied by adding nodes. Just select the circular path with the 'Node Tool' and hit the 'Add Nodes' button.

Here are some examples for variations of the pattern (click image for bigger version):
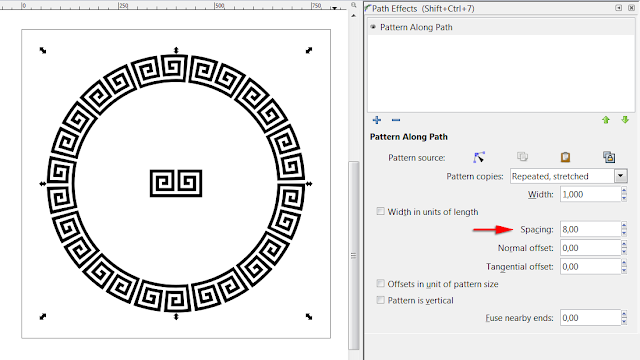
Whenever you work with a pattern that includes space beyond the bounding box, the 'Spacing' option comes in handy.
As you can see, the distortion of the Pap LPE takes great care of the pattern and turns it into a circular ornament.
You can get a similar effect form the Pap Extension by adding more nodes to the pattern, but its not as flexible as the LPE.


The Unit im using for the grid is 8px.


Duplicate, resize and rotate the rectangular building blocks as needed with the buttons in the Tool Controls and Command Bar.

Once everything is in place, 'Union' all the pieces into one single path.
This is the pattern we are going to apply to the circular skeleton path.

Either with the keyboard shortcut (CTRL + C), or the Menu (Edit → Copy), or the little icon in the Command Bar.

Once selected, apply the 'Pattern Along Path' LPE.
In case you dont have the LPE window open, you can find it in the menu under 'Path → Path Effects'.
Inkscape says the keyboard shortcut is 'Shift + CTRL + 7' but on my (german) keyboard its 'Shift + CTRL + 6'.
In the 'Pattern Along Path' (Pap) menu, click the 'Paste' button and set the 'Pattern copies' to 'Repeated, stretched'.


You may notice that once the pattern is applied, the skeleton circle is slightly deformed. This can be remedied by adding nodes. Just select the circular path with the 'Node Tool' and hit the 'Add Nodes' button.

Here are some examples for variations of the pattern (click image for bigger version):
 |  |
  |
 |  |

As you can see, the distortion of the Pap LPE takes great care of the pattern and turns it into a circular ornament.
You can get a similar effect form the Pap Extension by adding more nodes to the pattern, but its not as flexible as the LPE.

(distress effect made with Gimp and G'MIC)
No comments:
Post a Comment