In this episode im gonna show you how
to make an Inner Shadow.
This effect works more or less the same
as an Inner Glow, but mostly with dark colours and sometimes an
offset, which will give your text a 3D-ish look.
01. Start with a canvas 560x280px, Colour:
a80000
to make it look a bit less synthetic, i
applied a bit of RGB-Noise.
Uncheck 'Independent RGB' and apply a
value of 0,04 to the red/bue/green channels.
Im using the same font and values as in
my previous tutorial:
Sans Bold 215px, Spacing: -14, Colour:
666666
Align your text and alpha select.
02. Save this selection to a channel for
future use (Select → Save to Channel).
Saving the selection of my base text to
a channel has become a standard in my work with text.
It makes working with layermasks
easier.
Also sometimes your basetext will be
changed or gets lost in the workprocess, then a backup always comes
in handy.
03. For our Inner Shadow: activate selection from the saved channel and Invert it !
04. On a new transparent layer, fill the
selection with a colour you want your shadow to be.
I chose a dark grey 282828.
Then deselect !
Everything outside the
text-boundaries should now have the colour of the shadow.
05. Apply a Gaussian Blur.
As in our last tutorial, i used a value
of 25.
You can use bigger or smaller values,
depending on the effect you want to achieve.
06. Now we need to get rid of everything
that is outside the textboundaries.
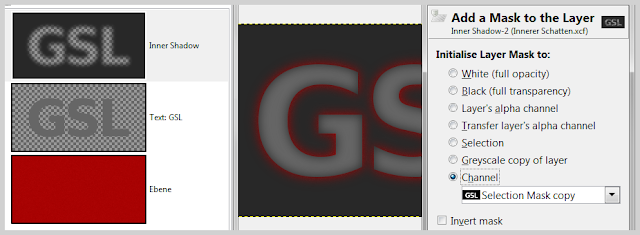
You can do this by inverting the saved
selection and hit the 'Delete' key (or Edit → Clear).
OR
and this is my favorite technique,
because it gives you more control:
apply a layermask 'from Channel'.
07. To finalize our effect, we change the
'Mode' and 'Opacity' of the shadowlayer.
'Multiply' and 75% are the default for
dark colours, but it depends very much on the whole piece and the
overall effect you want to achieve.
And this is your basic Inner Shadow texteffect:
As i said in the intro, Inner Shadows
often come with an offset, meaning the shadowlayer is moved, creating
an improved illusion of threedimensionality.
You can do this by using the 'Move
Tool' and just eye it.
Or with the Offset-Dialog under:
Layer →
Transform → Offset (shortcut: Ctrl + Shift + O).
The Offset-Dialog is a cool way of
giving other Gimpers the opportunity to copy the exact offset you used. Just note the values for X and Y-Axis in your tutorial.
Or by clicking once on your layer with the 'Move Tool' and then using the cursor-keys on your keyboard.
For this tutorial i used values that
give a very visible effect: 10/10 and this is what it looks like:
When you work a while with layereffects
and know them inside out, doing texteffects will be like „painting“.
But instead of painting with colours, you paint with layereffects.
Sometimes its difficult to find the
right offset for a layer, because the shadow is still all over the
canvas.
Here is a trick how you can make it
easier for you to see your final Inner Shadow will look like:
when you click the eye that is beside the saved channel, as mask made of 50% black will appear on your
canvas.
You can change the colour of this mask any way you like and
for the sake of this tutorial, i changed it to green, so you guys can
better see it.
With the mask active you can use the
'Move Tool' to drag the shadowlayer around and instantly see, what it
would look like after the layermask is applied.
Dont forget to turn off your mask before you export your final picture ! ;)
REPETITION:
01. type and then align your text
02. save alpha selected text to a channel
03. invert selection
04. on a transparent layer, fill selection with colour
4a. Deselect
4a. Deselect
05. Gaussian Blur
06. apply layermask
6a. offset shadowlayer
07. adjust Mode and Opacity


No comments:
Post a Comment