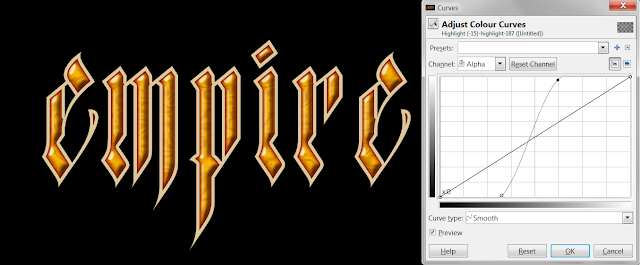
Yesterday i revisited the Amber texteffect i made in march.
Although the xcf had a lot of notes, i was unable to recreate the texture inside the inlay. I know i did it with the cubism filter, but it didnt look the same this time.
So i modified the effect. In some cases its an improvement, as i have learnt a lot in the past six months.
As usual im not explaining every tiny detail, as i expect you to know stuff from previous tutorials.
This effect requires you to work on your side, to make everything blend nicely.
Its art, not programming !
02. Type your text, im using the font
MCF Star Worms 756px, Spacing: 26.
This textlayer will be our ivory-coloured border when the
texteffect is finished and im using the colour #ddc79b.
03. Now some preparations:
alpha select your text, save it to a
channel and a path.
Shrink the selection by 10, save it to
a channel (name it '-10') and fill it on a new transparent layer with
an orange: #f3a413.
Name that layer 'Inlay (-10)'.
Deselect, alpha select your
basetext again and shrink it. This time by 15.
Fill the selection on a new transparent
layer with any colour (doesnt matter which one).
Name this layer 'Highlight (-15)'.
This layer will be the base for our offset highlights. Its just a technical layer we need for the layerfx-script because it does not work with selections.
This layer will be the base for our offset highlights. Its just a technical layer we need for the layerfx-script because it does not work with selections.
When you are finished, make the
'Highlight' layer invisible.
04. We start sculpting our effect by
creating two Inner Shadows to give the orange Inlay a 3D-ish look.
I)
Create a new transparent layer on top
of the orange 'Inlay' layer and name it 'Inner Shadow I'.
Alpha select the orange layer, shrink
it by 2, invert the selection and fill it with this dark red: #921b00.
Deselect and Gaussian Blur by 26px.
Apply a layermask from Channel '-10'.
II)
Create a new transparent layer on top
of the 'Inner Shadow I' layer and name it 'Inner Shadow II'.
Alpha select the orange layer, shrink
it by 1, invert the selection and fill it with this brown #2e0808.
Deselect and Gaussian Blur by 6px.
Apply a layermask from Channel '-10'.
Set the Mode to 'Hard Light' at 83%
05. Now for some texturing:
Create a new layer on top of the orange
'Inlay' and name it 'Texture'.
Render some 'Solid Noise' with x/y: 16
and the 'Turbulent' box checked !
Apply a layermask from Channel -10.
Apply a 'Colour to Alpha' with white
and then an Alpha-Curve, so you get something like this:
This curve can vary. On my first try re-doing this effect, it looked like this:
06. Turn of your background-layer and
the basetext, then apply a 'New from Visible'.
Go to G'MIC → Repair and apply
'Recursive Median' 13 on the 'New From Visible' layer.
Put the layer on top of the orange
'Inlay' layer, then set the Mode to 'Grain Merge' and reduce the
Opacity to 64%.
If necessary tune your layer with
Brightness/Contrast or Hue/Saturation/Brightness until you are happy.
07.
Set the Mode of the 'Texture' layer to
'Multiply' at 50% Opacity.
08. Now for some bevelling.
Duplicate the 'Inlay' layer, put it on
top of all layers and make it invisible.
With the invisible layer activated,
apply layerfx with the following values:
Highlight: #ffffe6
Shadow: #653c07
We dont need the highlight, thats why
the Opacity was set to 0%. You can delete it.
09. For a second bevel, activate the
'Highlight (-15)' layer and apply layerfx again with the same
values, but make sure the Opacity of the Highlight is at 75% this
time.
Shape Highlight and Shadow with an
Alpha-Curve and then balance the Opacity of your three bevel layers so everything blends nicely.

10. We are getting near the finishing
touches. Whats still missing is a bevel for the outer edge (= our original ivory coloured base-textlayer).
Use white for the highlight, but
#2c2c2c for the shadow, instead of black.
Shape the shadow with an Alpha-Curve,
like this:
11. Create a new transparent layer
underneath the orange 'Inlay' layer and name it 'Outer Shadow'.
Alpha select the 'Inlay' layer and fill
it with black.
Deselect and blur by 8.
Set Mode to 'Multiply' at 75%.
This layer is just for contrast
reasons.
12. Create a new layer on top of the
background and name it 'Stroke'. Go to your paths tab and stroke the
path you created earlier with white, 3px.
Then Gaussian Blur that layer by 2-3px.
13. I added two filter-grids from my previous tutorial and a dropshadow.
If you want to study what i did, here is the xcf-file:
If you want to study what i did, here is the xcf-file:
http://www.mediafire.com/?78a3eup1wfffj28
You could play a lot with that effect.
Expand the blur on the Inner Shadows for example or use different
colours.


No comments:
Post a Comment