In todays tutorial im gonna show you how to posterize an image manually.
This technique has several usages that you can apply to a lot of projects.
One application is for making stencils. It gives you more control than using Contrast or Quantizing your image.
Another application is using the posterized image as a base that you can trace in Inkscape and then modify with node editing.
You can also use it to apply textures, like hatchings, to an image or create a pop art effect.
As with most projects, the image you use is crucial. Look for a sharp image that has good contrast and lighting, and not too small.
Desaturate and if needed, add some Contrast or Brightness.
Im using an image of Marilyn Monroe from pixabay.com.
Its 1359x1920px.
1. Remove the background with any technique you like. I made a mask in Inkscape, because the Path (Bezier) Tool is very easy to use, so all i had to do is export the mask-image in the correct pixelsize and open it as a layer in Gimp.
You can download my cut-out mask here.
Also make sure you save that selection to a channel for future use !
You can use as many colors as you like for your posterization, but between two and five seems like a good value. The famous 'Obama Hope' poster by Shepard Fairey has five colors (actually four plus one additional tone that is achieved by mixing two colours).
2. Im going with five colors.
a) Add a layermask to your image.
b) Copy the cut-out mask layer and paste it into the layermask. A floating selection will appear.
Anchor that layer, by clicking the little anchor symbol.
(If you cut out your image with the Paths or Lasso Tool, apply the layermask from selection.)
We want the background to be white, so i put a new white layer under the original image.
c) merge your original image with the layermask down, then invert the image (Colours → Invert).
This image will be our mask.
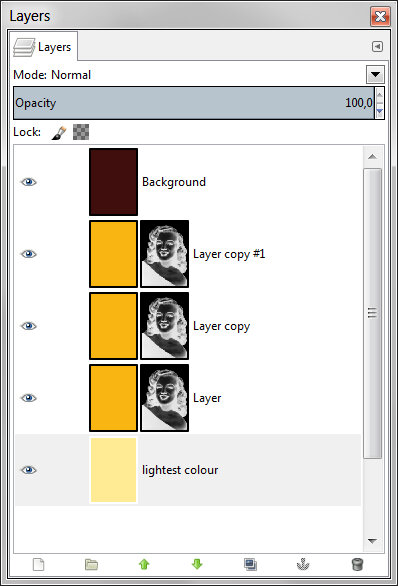
3. To set up the layers, copy the final mask-layer, and create a new layer.
Add a layermask and with the mask selected, paste and anchor the copied mask-layer.
In case you dont fully understand layermasks, here is a good short summary i picked up from Glyn Dewis youtubechannel:
black conceals and white reveals
So the layermask acts like a filter, showing all the colour (in this case yellow) that is white on the layermask, and blocking all the yellow that is black on the mask. Grey is represented by transparent yellow.
4. Duplicate that layer as many times as you want colors minus two.
Your first, lightest color, doesnt need a layermask and the background needs a different layermask.
5. Add a layermask to the darkest colour layer and copy/paste the mask you used to cut out your image, but invert it (click on layermask, then 'Colors → Invert').
6. Finally add all the inbetween colours, by dragging and dropping them to your layers (or use the Bucket Tool).
Darkest colours on top, lightest to the bottom.
7. Now its time for the creative fun part.
By manipulating the values of the layermask, we can control what the mask reveals or conceals.
Select the layermask and call up the Threshold Tool beginning with the darkest tone.
Move the slider to the right, until you have the amount of shadows you want. In my case im focusing on the eyes.
8. Repeat this for all the other tone-layers. In the screenshot below you can see the values i used.
If you are unhappy with a result, you can re-paste the original mask and try again.
You can use this method to colorize an image and give it a pop-art effect.
If you want to simplifiy and clean up the thresholded mask, you can blur it before you apply the thresholding.
In this example i used a value of 3px for the shadows to preserve detail and a value of 8px for the lighter shades.
What you can also do is make two images with the same colourscheme but different levels of simplification and later composite them with a black layermask and painting in all the bits you want with white.
For this image i used a version of the posterized image, where every layermask had a Blur of 20px applied before thresholding.
I used the strongly blurred mask version as the base and combined it with the detail of the eyes and lips of this tutorial's image.


No comments:
Post a Comment